이전 글에서 AutoEncoder의 개념과 구조를 배웠다면,
이번에는 직접 Pytorch를사용해 Fashion-MNIST 이미지에 AutoEncoder를 구현해보겠습니다.
Tensorflow로 구현한 내용도 이전글을 참고해주세요.
2025.07.28 - [AI/AI] - AI - AutoEncoder 직관적으로 이해하기
AI - AutoEncoder 직관적으로 이해하기
AutoEncoder란? AutoEncoder는 입력 데이터를 압축(Encoding)한 후, 다시 복원(Decoding)하면서 중요한 특징만을 학습하는 비지도 학습 모델입니다.간단히 말해서, 이미지를 입력으로 받으면, 중요한 특징만
foxyprogramming.tistory.com
2025.07.28 - [AI/AI] - AI - Tensorflow로 AutoEncoder 구현하기
AI - Tensorflow로 AutoEncoder 구현하기
이전 글에서 AutoEncoder의 개념과 구조를 배웠다면,이번에는 직접 Tensorflow와 Keras를 사용해 Fashion-MNIST 이미지에 AutoEncoder를 구현해보겠습니다.2025.07.28 - [AI/AI] - AI - AutoEncoder 직관적으로 이해하기 AI
foxyprogramming.tistory.com
라이브러리 임포트
import torch
import torch.nn as nn
import torch.optim as optim
from torchvision import datasets, transforms
from torch.utils.data import DataLoader
import matplotlib.pyplot as plt
import numpy as np
데이터 로드
transform = transforms.Compose([
    transforms.Pad(2),                 # 28x28 → 32x32
    transforms.ToTensor(),            # [0,255] → [0,1]
])

train_dataset = datasets.FashionMNIST(root='./data', train=True, download=True, transform=transform)
test_dataset = datasets.FashionMNIST(root='./data', train=False, download=True, transform=transform)

train_loader = DataLoader(train_dataset, batch_size=100, shuffle=True)
test_loader = DataLoader(test_dataset, batch_size=100, shuffle=False)
- transform : 기본적인 전처리 수행
- DataLoader : Pytorch는 Data Loader를 사용하여 기본적인 데이터 로딩 기능을 수행
Model 정의
class ConvAutoEncoder(nn.Module):
    def __init__(self):
        super().__init__()
        # Encoder
        self.encoder = nn.Sequential(
            nn.Conv2d(1, 32, 3, stride=2, padding=1),  # 32x32 → 16x16
            nn.ReLU(),
            nn.Conv2d(32, 64, 3, stride=2, padding=1), # 16x16 → 8x8
            nn.ReLU(),
            nn.Conv2d(64, 128, 3, stride=2, padding=1),# 8x8 → 4x4
            nn.ReLU(),
        )
        self.fc_enc = nn.Linear(128*4*4, 2)  # Latent vector (2D)

        # Decoder
        self.fc_dec = nn.Linear(2, 128*4*4)
        self.decoder = nn.Sequential(
            nn.ConvTranspose2d(128, 64, 3, stride=2, padding=1, output_padding=1), # 4x4 → 8x8
            nn.ReLU(),
            nn.ConvTranspose2d(64, 32, 3, stride=2, padding=1, output_padding=1),  # 8x8 → 16x16
            nn.ReLU(),
            nn.ConvTranspose2d(32, 1, 3, stride=2, padding=1, output_padding=1),   # 16x16 → 32x32
            nn.Sigmoid(),
        )

    def forward(self, x):
        z = self.encoder(x)
        z = z.view(x.size(0), -1)
        latent = self.fc_enc(z)
        x_hat = self.fc_dec(latent).view(x.size(0), 128, 4, 4)
        x_hat = self.decoder(x_hat)
        return x_hat, latent
- Encoder에서는 Conv2D 라이브러리를 사용하여 Latent Vector 생성
- Decoder에서는 ConvTranspose2D 라이브러리를 사용하여 Latent Vector에서 이미지 복원
- forward에서 인코더(fc_enc)와 디코더(fc_dec) 결합
Model Compile
device = torch.device("cuda" if torch.cuda.is_available() else "cpu")
model = ConvAutoEncoder().to(device)
optimizer = optim.Adam(model.parameters(), lr=1e-3)
criterion = nn.BCELoss()
Model 학습
for epoch in range(10):
    model.train()
    total_loss = 0
    for x, _ in train_loader:
        x = x.to(device)
        x_hat, _ = model(x)
        loss = criterion(x_hat, x)

        optimizer.zero_grad()
        loss.backward()
        optimizer.step()
        total_loss += loss.item()

    print(f"Epoch {epoch+1}, Loss: {total_loss / len(train_loader):.4f}")

model.eval()

with torch.no_grad():
    sample, _ = next(iter(test_loader))
    sample = sample.to(device)
    reconstructed, _ = model(sample)
복원된 이미지 확인
sample = sample.cpu().numpy()
reconstructed = reconstructed.cpu().numpy()

plt.figure(figsize=(20, 4))
for i in range(10):
    plt.subplot(2, 10, i+1)
    plt.imshow(sample[i][0], cmap='gray')
    plt.axis("off")
    plt.title("Input")

    plt.subplot(2, 10, i+11)
    plt.imshow(reconstructed[i][0], cmap='gray')
    plt.axis("off")
    plt.title("Reconstruction")
plt.tight_layout()
plt.show()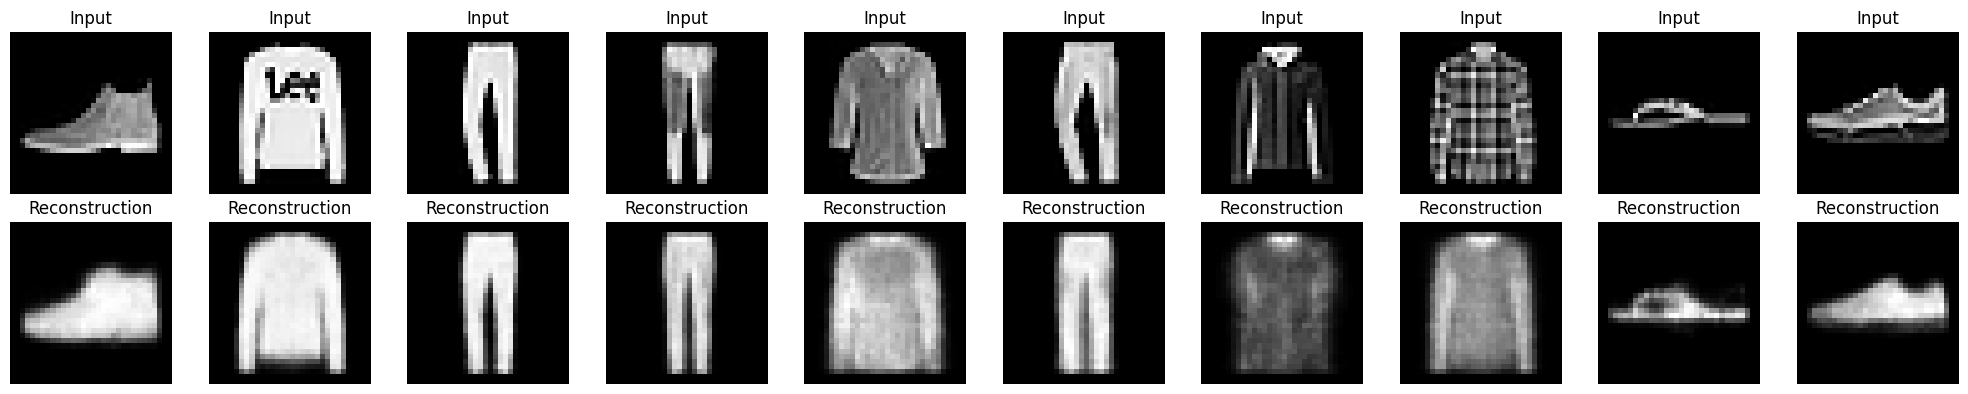
Latent Vector 시각화
all_latents = []
all_labels = []

model.eval()
with torch.no_grad():
    for x, y in test_loader:
        x = x.to(device)
        _, z = model(x)
        all_latents.append(z.cpu())
        all_labels.append(y)

embeddings = torch.cat(all_latents).numpy()
labels = torch.cat(all_labels).numpy()

plt.figure(figsize=(8, 8))
plt.scatter(embeddings[:, 0], embeddings[:, 1], c=labels, cmap='tab10', alpha=0.7, s=5)
plt.colorbar()
plt.title("Latent Space Visualization")
plt.show()

이번 실습에서는 Pytorch를 이용하여 Fashion MNIST 이미지 데이터를 기반으로 AutoEncoder를 처음부터 구현하였으며, Latent Vector를 시각적으로 분석하였습니다.
'AI > AI' 카테고리의 다른 글
| AI - Tensorflow로 AutoEncoder 구현하기 (1) | 2025.07.28 |
|---|---|
| AI - AutoEncoder 직관적으로 이해하기 (0) | 2025.07.28 |
| XAI란 무엇인가? (0) | 2024.08.21 |
| [AI] R-CNN 내용 정리 (0) | 2023.10.12 |
| [AI] Kaggle 데이터로 데이터 분석하기 _ League of Legends Diamond Ranked Games (0) | 2023.06.17 |


